Published on Monday, 27 September 2021
In this tutorial, You'll learn how to build forms with one or more input fields using JSX, understand how a html uncontrolled form transforms to a React controlled state form, retrieve the form data when submitted and save it to state using useState hook and finally, pass form data as props to a component and have the component render the data on the browser.
The project we will be building is a Contact form with three input fields for the contact's name, email, and phone number. when the form is submitted, the form data will be saved in a contacts state and passed to a contact list component, where it is rendered to the browser.
If you want a quick overview of how to build forms with multiple input fields using react hook, you can view it here. This article will beginner-focused or for anyone who wants to refresh their knowledge on react building React forms with useState hook.
1. Build a simple React form with multiple input fields
1npx create-react-app contact-info
2
3
Get rid of everything you don't need, here's a link to what my app looks like after getting rid of content and files I don't need; Cleanup application
In the src folder, create a file src/components/ContactForm.jsx, this component contains the code to build the form.
1
2export default function UserForm() {
3
4  return (
5    <div>
6      <form>
7        <div>
8          <h3>Contact Form</h3>
9        </div>
10        <div>
11          <input
12            type="text"
13            name="name"
14            placeholder="Name"
15          />
16        </div>
17        <div>
18          <input
19            type="email"
20            name="email"
21            placeholder="Email"
22          />
23        </div>
24        <div>
25          <input
26            type="number"
27            name="phonenumber"
28            placeholder="Phone Number"
29          />
30        </div>
31        <div>
32          <button>Submit Contact</button>
33        </div>
34      </form>
35    </div>
36  );
37}
38
39
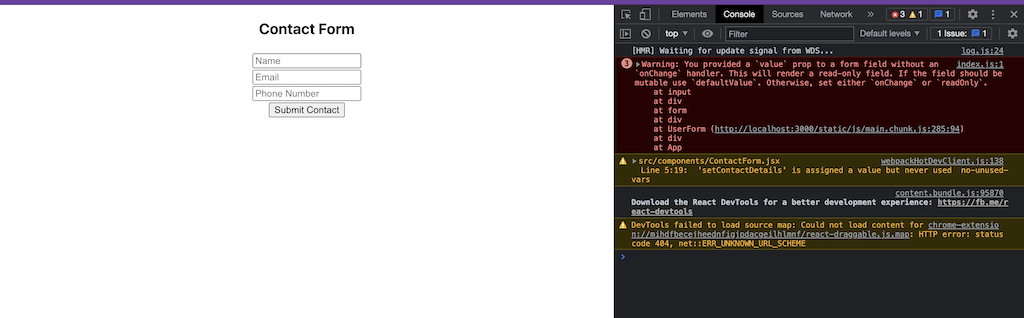
Adding the type to the input field, HTML validates the email and number input.It will check that whatever the user inputs for email is an email and for phone number, must be a number.
Import UserForm.jsx into App.js to see the form rendered on your browser.
1import ContactForm from "./components/ContactForm.jsx";
2import "./App.css";
3
4function App() {
5  return (
6    <div className="App">
7      <UserForm />
8    </div>
9  );
10}
11
12export default App;
13
14
2. Converting JSX Form to a Controlled Form with React Hooks
Now that we have a simple form being rendered on the browser, we are going to convert the form input state to be controlled by React. By default, forms handle their own state. Converting the form to a controlled state is telling React to take over the form state from the browser in the following ways;
- Creating a
stateobject to store the form data. React uses theuseState hookto handle the form state. - Add the
valueproperty to the form, and assign it to thestateobject properties. - Add an
onChange event listenerfunction to handle updating the form state.
useState is a React hook used to manage state in functional components.
state is the information we don't want to lose while the page re-renders.
Navigate to src/components/ContactForm.jsx , import useState hook from react.
Create a contact state with the form input names as the properties.
Add value property to each input field and set the value to contact state properties as illustrated below.
1
2import { useState } from "react";
3
4export default function UserForm() {
5
6  const [contactInfo, setContactInfo] = useState({
7    name: "",
8    email: "",
9    phonenumber: "",
10  });
11
12  return (
13    <div className="form-container">
14      <form>
15        <div>
16          <h3>Contact Form</h3>
17        </div>
18        <div>
19          <input
20            type="text"
21            name="name"
22            placeholder="Name"
23            value={contactInfo.name}
24          />
25        </div>
26        <div>
27          <input
28            type="email"
29            name="email"
30            placeholder="Email"
31            value={contactInfo.email}
32          />
33        </div>
34        <div>
35          <input
36            type="number"
37            name="phonenumber"
38            placeholder="Phone Number"
39            value={contactInfo.phonenumber}
40          />
41        </div>
42        <div>
43          <button>Submit Contact</button>
44        </div>
45      </form>
46    </div>
47  );
48}
49
50
React now has control over the form but we are yet to update the input fields.
we are setting the value in the input fields to the contact state properties.
If you check your form in the browser, you will realise you can't type in the input fields, that's because React has no way to track the value of input elements.
The onChange event Listner is how React updates the input fields in real-time.
Let's add a handleChange function to take care of updating the input fields. Add this below contact state.
1const handleChange = (event) => {
2    setContactInfo({ ...contactInfo, [event.target.name]: event.target.value });
3  };
4
setContactInfo is a function that comes with useState Hook and it's used to update our current state object.
To preserve the previous state, we spread the contactInfo data using the javascript spread operator. This way, the previous data is not lost while we update the input state.
For example, without spreading the previous state, the only state that will be saved in the contact state when you submit your form data is phone number. setContactInfo will replace the old state with the new state which will be the last input field you updated(phone number).
To handle multiple controlled input elements, the name attribute added to each input element is used by setContactInfo to update the contact state properties based on the values from event.target.name.
3. Retrieving Form Data from Controlled Input Field.
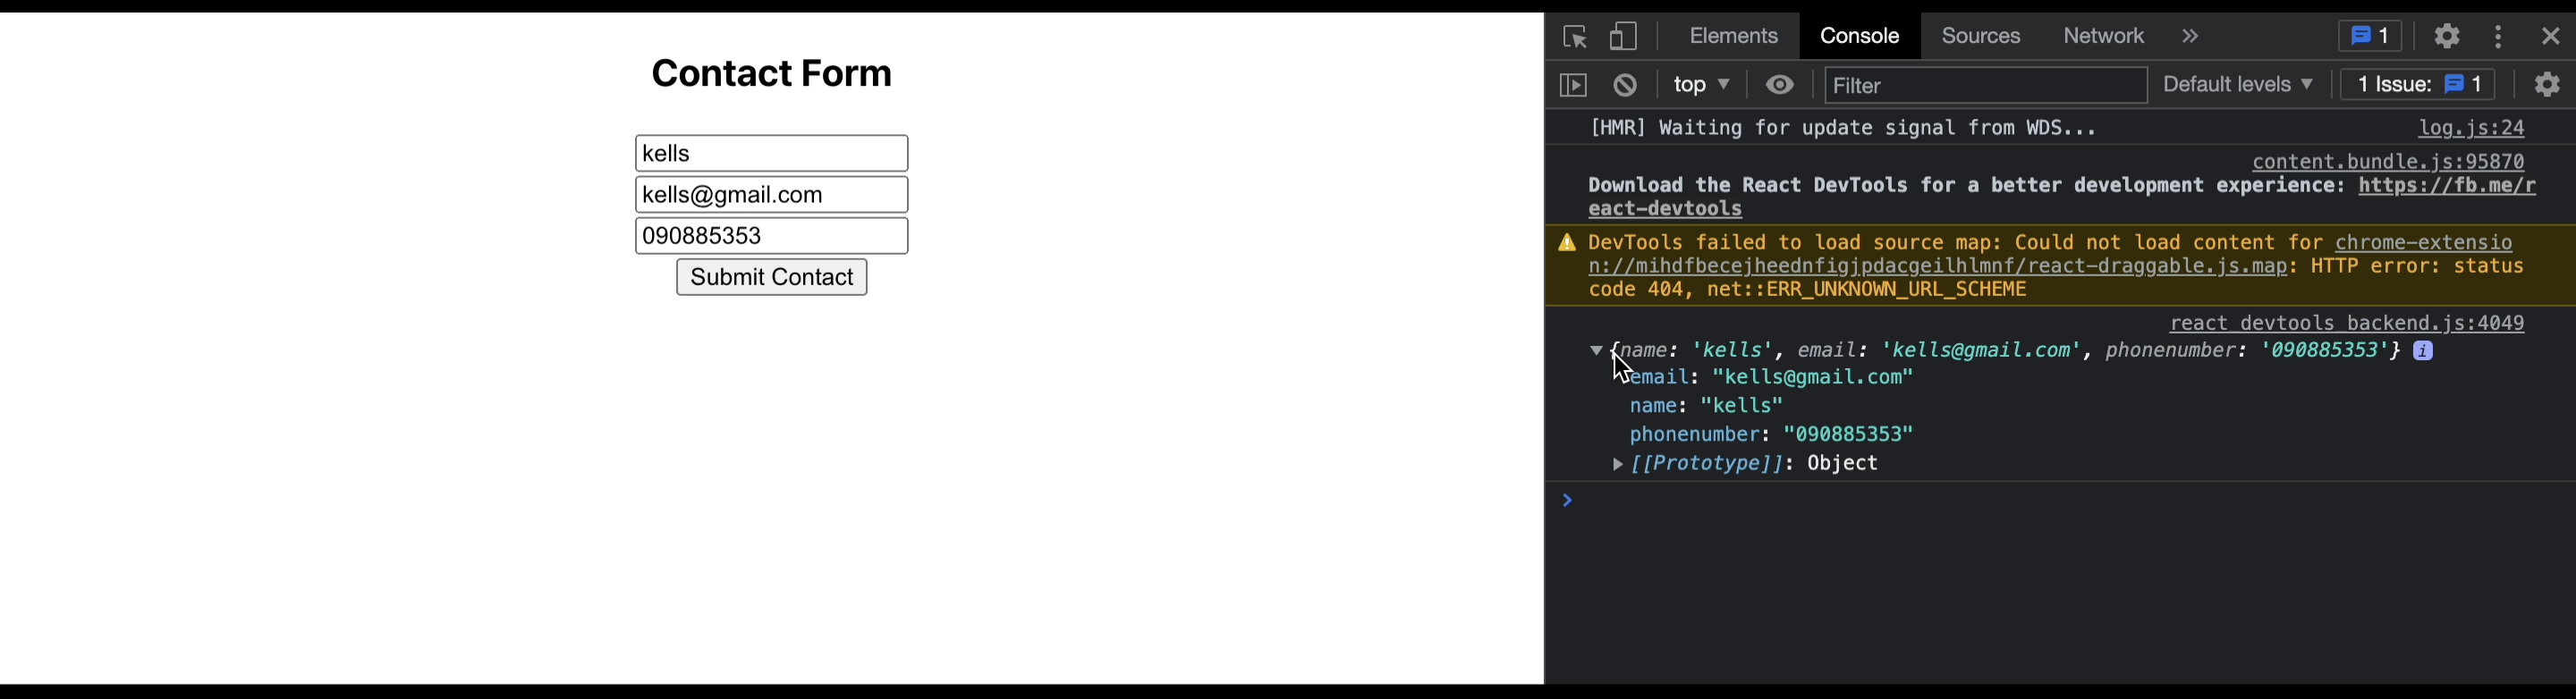
Now, Let's log the form data to the console using a handlesubmit function.
The handleSubmit function will log the contactInfo state to the browser.
Navigate to ContactInfo and add the handleSubmit function.
Pass the handleSubmit function to an onSubmit event listener in the <form> tag. When the submit button is clicked, the user data is logged to the console.
1const handleSubmit = (event) => {
2    // prevents the submit button from refreshing the page
3    event.preventDefault();
4    console.log(contactInfo);
5  };
6
7
8
9<form onSubmit={handleSubmit}>
10
11
Last, let's clear the input field when the submit button is clicked, set the contactInfo state variable to an empty string. Update handleSubmit function like so
1const handleSubmit = (event) => {
2    event.preventDefault();
3    console.log(contactInfo);
4    setContactInfo({ name: "", email: "", phonenumber: "" });
5  };
6
4. Display Form Data in Another Component
in this phase, you learn how to pass data from parent component to child component. This data will be passed from App.js(parent) to the ContactList (child) component where it is displayed.
Now that we have our form data, let's display this data in ContactList.jsx.
Before that, let's create a contacts state in App.js to store each contactInfo object data gotten from ContactForm.jsx. It serves as data.
This contacts state will be passed as props to the ContactList.jsx component.
Navigate to App.js and create a contacts state using useState React Hook and set it to an empty array.
Create an addContact function that takes contactInfo as a parameter for updating the contacts state.
pass addContact function as props to the ContactForm.jsx component. This is also an example of passing data from parent to child component.
1import { useState } from "react";
2import ContactForm from "./components/ContactForm.jsx";
3import "./App.css";
4
5function App() {
6  // here we create an array state to store the contact form data
7  const [contacts, updateContacts] = useState([]);
8
9  const addContact = (contactInfo) => {
10    updateContacts([...contacts, contactInfo]);
11  };
12  console.log(contacts)
13
14  return (
15    <div className="App">
16      <ContactForm addContact={addContact} />
17    </div>
18  );
19}
20
21export default App;
22
Using object destructuring in javascript, get addContact from props, Update the handleSubmit function so instead of logging the data to the console, pass it as a parameter to the addContact function.
1import { useState } from "react";
2
3export default function UserForm({addContact}) {
4
5const handleSubmit = (event) => {
6    event.preventDefault();
7
8    addContact(contactInfo);
9
10    setContactInfo({ name: "", email: "", phonenumber: "" });
11  };
12
When you submit the form, the contacts state is updated with the new form state.
Now that we have an array of contacts, let's display each contact info in a ContactList component.
Pass Contacts state data as props to a React component.
Last on the agenda is setting up the ContactList.jsx to display the contacts state data.
create a ContactList file in src/components and export a simple <div> tag to prevent the app from breaking.
Import ContactList file into App.js and pass contacts data as props to contactList component
1import { useState } from "react";
2import ContactForm from "./components/ContactForm.jsx";
3import ContactList from "./components/ContactList.jsx";
4import "./App.css";
5
6function App() {
7  // here we create an array state to store the contact form data
8  const [contacts, updateContacts] = useState([]);
9
10  const addContact = (contact) => {
11    updateContacts([...contacts, contact]);
12  };
13  console.log(contacts)
14
15  return (
16    <div className="App">
17      <ContactForm addContact={addContact} />
18      <ContactList contacts={contacts} />
19    </div>
20  );
21}
22
23export default App;
24
Navigate to src/ContactList.jsx, retrieve the props data passed into the component using destructing as we did for ContactForm.jsx.
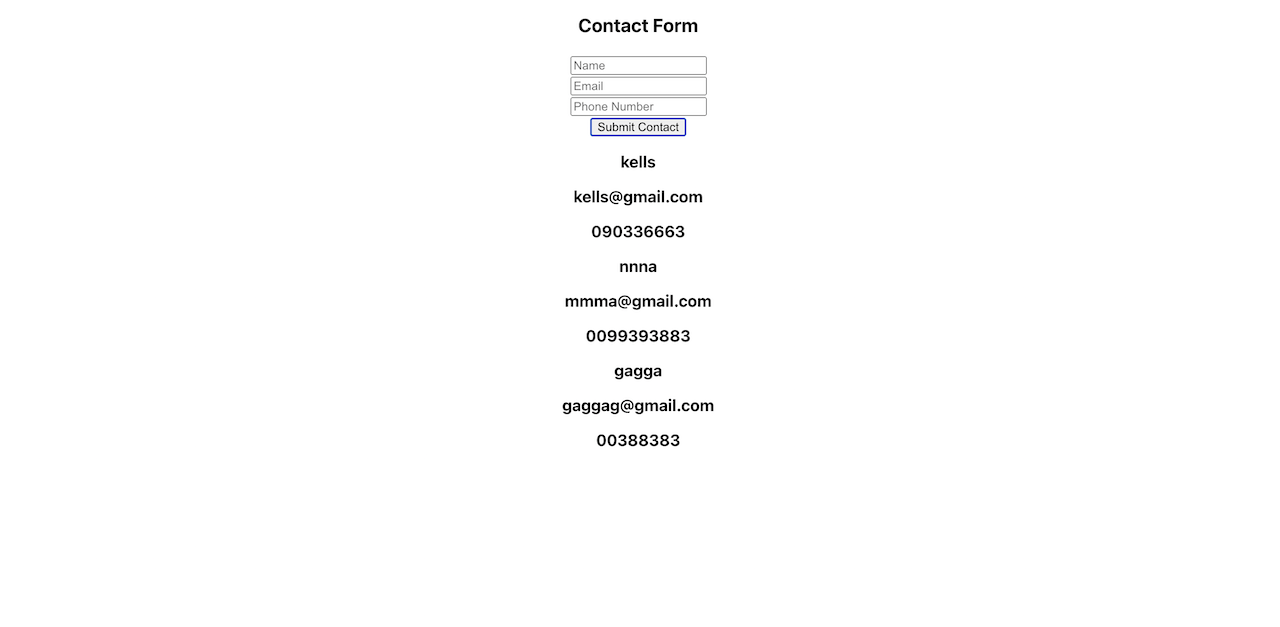
Due to contacts data being an array, we need a way to display each contact detail. I'm using Array.prototype.map() to loop through each value in and setting the key attribute value to phone number because it is guaranteed to be unique. The key attribute is how React keeps track of the values in the array.
the <p> tag is used to display name, email and phone number of each contact object
1
2export default function UserList({contacts}) {
3  return (
4    <div>
5      {props.contactList.map((contact) => (
6        <div className="card" key={contact.phonenumber}>
7          <p className="card-name">{contact.name}</p>
8          <p>{contact.email}</p>
9          <p>{contact.phonenumber}</p>
10        </div>
11      ))}
12    </div>
13  );
14}
15
At this point, when you fill the form and click on the submit button, the data is displayed on the page.
Conclusion
In this tutorial, I covered;
- how to set up a basic React app using create-react-app and create a simple jsx form.
- how React converts an uncontrolled form to a controlled form component.
- how to retrieve the form data and pass it as props to another component.
- Create a React functional component that takes the form data as props and renders it to the browser.
To view the full project code, link to Github repository.
Discuss on Medium
Recommended Reads